Friday, March 7, 2014
Snowy Owls!
This week I saw and photographed my first wild Snowy Owls! It's an irruption year for Snowy Owls who are visiting us in good numbers. I have been watching the reports in my area, but with my focus being on landscape photography rather than wildlife, I wasn't prepared.
I traded my long lens and crop frame camera for a full frame camera with wider lenses about a year ago. I realized I could rent a lens if the time came. With winter's days numbered, the time had arrived. The 2005 Great Gray Owl irruption was before my time and I always wished I was there to be a part of it. Well I didn't want to let this one pass by.
I'm shooting with a Canon 6D and I rented a Canon 400mm f/5.6 L lens. The 6D is a bit slow for wildlife photography at 4.5 fps. The full frame camera isn't exactly ideal depending on whether you need some extra reach. But it ended up working out just fine!
We arrived at the Sax Zim Bog at around 8:00am and found our first owl in less than 10 minutes. It was a Great Gray but is was off in the distance hunting. We found our first Snowy Owl about 5 minutes after that. Sitting on the roof of a house along a busy road. We decided to check another spot and we found this beautiful bird hunting a wide open field with fresh snow.
I just can't get over the beauty of these birds. It was amazing seeing this arctic beauty right here in Minnesota. If you live in the northern part of the United States I suggest looking for reports in your area. It could be there are Snowy Owls right in your neighborhood.
Saturday, November 2, 2013
Follow me on Google Plus!
Over the past few months I've taken a concerted effort to use Google+ to share my photos and other thoughts. There is a much broader audience on Google+ with more discoverability and in turn a larger following.
This has led to reconsider how I use the blog. I could post in both locations. However, I think I decided that using Google+ to post most things is best. For longer form reviews, tests or any subject I want to go into depth, I will post here on the blog. So for now, if you want to follow my work, please circle me on Google+ !!
Monday, September 23, 2013
Back to Banff!
I have been reliving my experience in Banff National Park for years. I didn't think I would be going back so soon, but guess what. It's happening! Actually it's happening in just about a week. Banff is a special place for me for several reasons. It was where my wife and I went on our honeymoon 4 years ago. We stayed in the town of Banff and at the Chateau at Lake Louise. It was an incredible experience.
It was also the first time I had seen the rocky mountains. Seeing those mountains was a life changing experience. I live on the flat plains of Minnesota. We have a beautiful landscape in our own right, the land of 10,000 lakes. Northern Minnesota has similar beautiful conifer forests that surround beautiful lakes. But we don't have the MOUNTAINS. It was a beauty like I've never seen before. That mixed with water that is impossibly blue, it's a beauty I will never forget.
It will only be a short trip, four days and three nights, but we plan to make the most of it. A friend of mine will be joining me on the trip and it should be an incredible experience for him as well. Like me, four years ago, this will be his first trip to the rocky mountains. Also, he is new to photography. What a unbelievably photogenic place to learn. Although this location will be tough to beat, it might be all downhill for him after this!
Tuesday, July 9, 2013
Yosemite Star Trail
I only had one night to photograph the night stars in Yosemite. It was basically my first time photographing at night period and I had my fair share of problems. This star trail was made from a series of photographs while I was trying to make a time lapse. Unfortunately my camera randomly stopped shooting while I was snoozing in the car. Since the time lapse stopped early, it only made for a very short video. But I was able to stack the photos in Photoshop to make this cool star trail.
Wednesday, May 22, 2013
Lesson Learned: Time Lapse Part 2
Nikon D600, Nikkor 16-35 f/4 @ 2 sec intervals
While on my recent trip I had a tendency to shoot a little of everything. I would bracket some exposures for HDR, maybe do a panorama, even do a HDR panorama. I experimented with focus stacking, oh and long exposures. I got a pretty neat Hoya 9 stop ND filter. Oh and if the scene warranted those techniques, then why not a time lapse as well?
To be fair, I'm new to at least a couple of these techniques but I was excited to try them out. If you want to do it right, special thought probably needs to go to each of these. Time lapses are no different. Here's a list of things that I MUST remember for each time lapse, because a lapse in memory will kill the shot.
- Have plenty of memory on the card for the amount of photos your going to take. In many cases I take 300 photos which gives me 10 seconds of video at 30 fps
- Do the math. Calculate the time you'll need to be standing there. For example if you want 300 shots and plan to use a 2 second interval. 300 shots x 2 seconds = 600 seconds. 600 seconds / 60 seconds per minute = 10 minutes. This is especially important if your doing any type of long exposure. Say your doing night photography and you need 30 second exposures. Then you take 30 second exposure + 2 second intervals = 32 seconds. 300 shots x 32 seconds = 9600 seconds. 9600 seconds / 60 seconds per minute = 160 minutes. So in this case... bring a chair.
- Put the camera in manual focus mode. You can auto focus to make sure it's set properly, but then switch it to manual. The last thing you want is the camera to be trying to find focus between each shot. Slight variations in focus will cause a zooming effect. This effect will made the video choppy and hard to watch.
- Turn off VR, IS, VC, OS or whatever your lens manufacturer calls it. Just like the auto focus causing movement, so can the stabilization. So turn it off.
- Take several practice photos to make sure your settings are right. Look at the photo and histogram.
- Start the time lapse as a test to make sure everything is working properly. I had a situation where I set the camera to 300 images, only to realize it was counting down by 5. So it went 300, 295, 290, 285, etc. If I would have realized this sooner I could have saved some time and hassle.
I hope this blog post was helpful. Please contact me anytime with any questions. And when you create some beautiful time lapses videos, be sure to get a hold of me so I see your amazing work!
Saturday, May 11, 2013
Lesson Learned: Time Lapse Part 1
Time Lapses have become very popular over the last couple of years. Today there is easy to use software, built in time lapse or interval timers and plenty of online tutorials. All of this has made making time lapses more accessible to the hobby photographer. As soon as I realized this was something that I could do with my current equipment, I was ready to go.
Well almost, there was a bit of a learning curve and I had to do my research. I did some tests and some more research. This isn't a time lapse tutorial, I don't think I'm quite ready to be writing one of those yet. When I become more proficient, then maybe I will write one. In the meantime, I thought I would share a couple of lessons I've learned along the way.
- Buy a battery grip or at least extra batteries. On my recent trip to Yosemite NP, I brought my brother's (Derek) D7000 camera as a second body. He had a battery grip and 2 batteries which, as it turns out, are the same batteries as my D600. The two extra batteries were very important.
- Buy an external intervalometer. My D600 has an interval timer built in but I found it to be unreliable. This issue is maybe a blog post of it's own, so I won't go into detail. But I found at times it wouldn't take the right amount of photos. For example, I set it to take 300 photos, but it counted down by 5. It went, 300, 295, 290, 285 etc.. On a couple of occasions it just stopped completely despite having plenty of battery and memory space. I've heard plenty of good things about the generic intervalometers and I'll probably go with the Satechi MTR-M
. But I haven't tested it yet, so don't quote me on that.
- Buy extra memory cards. I had a 32g, two 16g and two 4g cards with me. I also had a 32g in my GoPro which I could pull if necessary. Derek's camera had another 16g card which I ended up using as well. This was a pretty short trip, so if I plan a longer trip next time, I will need more cards. I could have formatted, transferred to my Macbook and kept going, but I prefer not to format anything until I get home if I can help it. 32g & 64g SanDisk
are cheap next time I'll bring some extras. I found that on a 32g card I could get about 1000 photo's with my D600 in RAW mode. I tend to go for 300 image time lapses which gives me 10 seconds of video at 30fps. So you can see how just a few time lapses will fill a card.
I know this turned out to be a list of things to buy. But the good news is none of them are that expensive, especially compared to what we are used to when comes to photography gear. If you do decide to buy these products please purchase them through amazon via our links in the page or the search feature to the right. It help support Natural Vision Photography. Thanks!
Labels:
advice,
California,
chad griggs,
mountains,
national park,
natural vision photography,
north america,
photography,
rockies,
rocky mountains,
time lapse,
tips,
united states,
western,
yosemite
Wednesday, April 24, 2013
Back from California
| Nikon D600, Nikkor 70-700 VR, 6 shot vertical panorama |
It was my first trip to California and I have to say I was blown away by it's beauty. The diversity of beauty is what really has me jealous though. My wife and I did a kind of a mad dash across California. It was great to see the great diversity in landscape, but I really want to take a more focused approach next time.
We started in Yosemite and saw the great valley cliffs and mountains which included vast wilderness. Then we went to Monterrey and saw the coast as we drove through Big Sur down the Pacific Coast Highway 1. I have to say I was very surprised by the epic drive on Highway 1. I knew it would be a nice drive, but it was down right insane. We had clouds rolling in off the ocean which then made a steep climb up the mountain and over the road. We saw this rising of the clouds for most of the drive and it was awesome. I have to say that Yosemite was beautiful, but I knew it would be. I was surprised by Big Sur though, it's beauty was unexpected.
The next leg of the tour was to Los Angles which was not photography related but still an area in which a photographer could enjoy a wealth of subjects.
In coming posts I'll share some photos as well as time lapses that I took. I'm new to time lapses and will share what I learned. I also did a bit of work at night for the first time. I ran into some unexpected problems there as well and will share my experiences. So stayed tuned!
To stay informed with what I'm up to please follow me on the various social networks on the right of the page!
Saturday, March 23, 2013
6 Tips for an Efficient Trip
Can you feel the excitement? I can! Yes, I'm going to Yosemite in just a few weeks. Actually I will be visiting Yosemite as well as the California coast between Monterey and Los Angles. It feels a little odd, I normally put some sort of photo at the top of my blog posts. But I've never been to Yosemite or anywhere in California, so I don't have any photos to use. Well, I'll have to change that won't I.
That's right, new content is coming soon. I'm spending two nights in Yosemite, one night in Monterey and a couple more in LA. Many of you may be able to relate with this scenario... This is a vacation/photography trip. The vacation part is where the photography gets limited. Many of us that don't get to travel as much as we'd like, so we end up splitting time between photography and spending time with our family. This is where it becomes extremely important to be efficient with your time. Here is a short list of things you can do to prepare for an efficient trip.
- 500px.com is not just a website with beautiful images. It can also be an excellent source to give you an idea of what people are shooting in a specific area. As with all photography communities you'll see a lot of similar images from the popular locations. This is fine, and if it's the first time you've been there, you'll want to hit the hot spots. There is usually other helpful information as well. Much of the images metadata is shown which can often tell you what focal lengths are used and what time of the year it was shot at.
- Google Drive. Wait what? Yes, Word documents, Dropbox, Evernote, or any other note taking method will work. I have created a document which has names of locations, maps, hiking trails and travel times. There are links to 500px for reference photos and other websites which may be helpful. Many of these note taking services have apps on your phone so you can reference it in the field.
- Google+ Community feature is another excellent place to go for information. There are many passionate photographers who are eager to help others and share information. There may be a community that focuses on the particular area where you are traveling. Any questions you may have or tips you can gather will be invaluable on the trip. This strategy can be extended to other online communities.
- Google Maps and Google Earth. No really, this isn't a google advertisement. This may be obvious but checking drive times to various locations is very important. You can also get a pretty good lay of the land by familiarizing yourself with the area. You'll want which way is north and more importantly which way the sun will be rising and setting.
- The Photographer's Ephemeris along with Maps, this will really help you get a handle of where the sun will be rising and setting. TPE is a iOS and Android App which will show the sun and moon angles from any given location and time. So with this app, you'll know exactly how to get that sunrise shot as efficiently as possible.
- Stellarium is a free open source planetarium that can be downloaded on your Windows PC, Mac or Linux. You might wonder why this is important. Well, I'm very excited to try some night photography while in Yosemite. With the night shots I want to include both the beautiful scenery as well as the beautiful glow of the stars and Milky Way. With this program, similar to TPE, I can type my location and time and it will show me where the stars will be located in the night sky. If I want to get the Milky Way in the shot, I will know when the best times will be. Similarly, it will show me the exact position of the moon at various times of the night. The moon can be helpful or an obstruction depending on what type of shot you want. This tool will take some of the guess work out.
This has been my workflow for the past month or so. With our busy schedules, efficiency one of the most important aspects of a successful trip. A good research and planning process becomes key. I hope this list helps make your trip a successful one.
Thursday, February 21, 2013
Nikon D600; Initial Thoughts
On the surface the camera's look pretty similar. Even when you dig into some of the specs you find a lot of similarities. They both look and feel pretty similar with similar button functions and placement. Although I immediately noticed that the [Zoom - / Qual] button and [Zoom + / ISO] button were inexplicably reversed. So every time I was reviewing an image and wanted to zoom in or out I was always pressing the wrong button. And if I tried to change the ISO, yep, always pressed the wrong button. I'm sure I'll get over it.
On with other specs.. They both have dual card slots and share the 39 pt AF system. But the real reason you buy the D600 is for the sensor. My first trek out with the D600 was our local zoo which was a dark and cloudy day. It was actually a trip with my wife and son, but I just couldn't resist testing out the new camera. I have to say I'm speechless at the high ISO capability. I've gone from the D50 to the D40x then D90, D7000 and now D600 and I've never been so impressed. (The jump from the D40x to the D90 was very impressive). In the past there was a scale on when you'd be willing to use your higher ISO. So like if you were shooting a common species you'd be willing to go to maybe 800 ISO, beyond that, you'd probably just be better off waiting for better light. But if it was it was a rare species then you didn't care, anything to get a shot for the archive... crank that thing up to 6400 ISO... Never post it online and make sure you view it with the door closed so nobody else will ever see it.
But this is different. I shot a few at 3200 ISO and then 6400. I even accidentally shot at Hi
![]() |
| Nikon D600 w/ 70-300VR @ 180mm, f/5.6, 1/50 sec (handheld) ISO 8063 |
![]() |
| ISO 8063 @ 100% |
![]() |
| ISO 8063 @ 100% |
I think I'll just leave it at that for now. People might be thinking about switching to FX from the D7000. But now with the announcement of the D7100, there are going to be even more comparisons to come. Hopefully I'll get my hands on a D7100 for a direct comparison.
Stay tuned!
Wednesday, February 13, 2013
Best North American Landscape...
If you could go anywhere in North America for landscape photography... Where would you go? I've only really photographed a few areas, all of which I love. Minnesota's North Shore, Yellowstone, Grand Teton NP, and Banff National Park. I have an upcoming trip to plan, of which I only have four days. Should I go back to a place I've already been and refine my photography? Or should I explore a new National Forrest or National Park?
If you could pick one place to go to photograph landscapes in 2013, where would you go? If you already picked a favorite place, where did you pick? I've decided this is a fun game... so play along! :)
Please respond in the comments or on Google +
Thursday, January 31, 2013
OM-D and Me.. Not Meant to be..
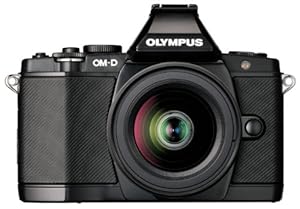
I wanted to do a follow up to my previous entry with regards to the Olympus OM-D
. See "Pondering Olympus OM-D" for that article.
Previously I went through some of the features and thought about the many benefits of the OM-D. And the fact is, I really was pondering whether or not I should stick with my Nikon system or ditch it for Micro Four Thirds.
I've always felt that my place in photography was a little bit different than most. One example of this is that for most photographers, portraits, weddings, travel etc.. the 70-200 or 24-70 range are perhaps the most important. Whereas for me, I always wanted the longer and longer and longer focal length, to get up close to the wildlife. So where some would ponder upgrading their 70-200 f/2.8 VR to the 70-200 f/2.8 VR II, I would contemplate if I should step up from my 300mm f/4 to a 300mm f/2.8 etc. Some would hold FX cameras in very high regard, but I always wanted the extra reach of the crop factor. Therefore a D300S replacement was my holy grail.
After pondering the OM-D for a while and trying not to get myself sucked into whats new, cool and popular. I decided I really should be looking at is what's best for the type of photography that I want to do. So what kind of photography do I want to do?
2012 was a year off, photography wise. Late 2011 brought the birth of my first child and all of 2012 was my wife and I learning how to be parents and adjusting to our new lives. Of course, I broke out the camera to get baby photos. But as far as nature photography goes, it was a quiet year. Over the course of that year I think my photography desires changed a little bit. I decided I wanted less of a focus on wildlife and a stronger focus on landscapes, night photography and time lapse. I also have become interested in travel photography. I don't travel as much as I'd like, but it's one thing that my wife and I really enjoy doing together. So that is a photographic opportunity I don't want to pass up.
So how would the OM-D fit into this slightly different role? I would say that it would have fallen into the roll wonderfully, with one exception. The fact that I didn't want to say good bye to wildlife photography altogether. I simply want to refocus my attention on landscapes as my primary subject. Although the Micro Four Thirds system does have the benefit of a 2x crop factor, it still falls short in autofocus and selection of quality super telephoto prime lenses. Now, what would happen if a micro four thirds 300mm f/4 lens came out? That would be the equivalent of a 600mm f/4? Wowsers! That would be pretty insane. It may not address the AF issues, but it should be known that the AF issues will be addressed over time.
In the end I decided to go with what's best for me now, not what could be best if this, this or this happened. And what's best for me now is a camera that has a feature set that would excel in landscape photography, night photography and time lapse. A camera that would be good for photographing my now 1 year old boy as well as be a good travel camera. A camera that would still be able to become an excellent wildlife camera when paired with one of the many great super telephoto lenses available.
So what did I choose? Stay tuned
Previously I went through some of the features and thought about the many benefits of the OM-D. And the fact is, I really was pondering whether or not I should stick with my Nikon system or ditch it for Micro Four Thirds.
I've always felt that my place in photography was a little bit different than most. One example of this is that for most photographers, portraits, weddings, travel etc.. the 70-200 or 24-70 range are perhaps the most important. Whereas for me, I always wanted the longer and longer and longer focal length, to get up close to the wildlife. So where some would ponder upgrading their 70-200 f/2.8 VR to the 70-200 f/2.8 VR II, I would contemplate if I should step up from my 300mm f/4 to a 300mm f/2.8 etc. Some would hold FX cameras in very high regard, but I always wanted the extra reach of the crop factor. Therefore a D300S replacement was my holy grail.
After pondering the OM-D for a while and trying not to get myself sucked into whats new, cool and popular. I decided I really should be looking at is what's best for the type of photography that I want to do. So what kind of photography do I want to do?
2012 was a year off, photography wise. Late 2011 brought the birth of my first child and all of 2012 was my wife and I learning how to be parents and adjusting to our new lives. Of course, I broke out the camera to get baby photos. But as far as nature photography goes, it was a quiet year. Over the course of that year I think my photography desires changed a little bit. I decided I wanted less of a focus on wildlife and a stronger focus on landscapes, night photography and time lapse. I also have become interested in travel photography. I don't travel as much as I'd like, but it's one thing that my wife and I really enjoy doing together. So that is a photographic opportunity I don't want to pass up.
So how would the OM-D fit into this slightly different role? I would say that it would have fallen into the roll wonderfully, with one exception. The fact that I didn't want to say good bye to wildlife photography altogether. I simply want to refocus my attention on landscapes as my primary subject. Although the Micro Four Thirds system does have the benefit of a 2x crop factor, it still falls short in autofocus and selection of quality super telephoto prime lenses. Now, what would happen if a micro four thirds 300mm f/4 lens came out? That would be the equivalent of a 600mm f/4? Wowsers! That would be pretty insane. It may not address the AF issues, but it should be known that the AF issues will be addressed over time.
In the end I decided to go with what's best for me now, not what could be best if this, this or this happened. And what's best for me now is a camera that has a feature set that would excel in landscape photography, night photography and time lapse. A camera that would be good for photographing my now 1 year old boy as well as be a good travel camera. A camera that would still be able to become an excellent wildlife camera when paired with one of the many great super telephoto lenses available.
So what did I choose? Stay tuned
Wednesday, January 9, 2013
Pondering Olympus OM-D E-M5
The Olympus OM-D E-M5
is an interesting camera. Initially I wrote off the whole micro four thirds segment and thought it just a more advanced "Point and Shoot" camera. In my mind I placed them just below the entry level DSLR's. To be honest, I haven't given it much thought since.
Enter this week's guest interview on This Week in Photo podcast. Scott Bourne who was an original host of the podcast and has been an inspiration of mine for years. Now Scott is onto other things but as I was browsing my podcast feeds, I noticed he was making a guest appearance. Scott mentioned a lot of interesting things about this Olympus camera, many of which got me thinking.
It should be noted that at this point I have never used the camera and so these are just my initial thoughts on the subject. Scott mentioned that the OM-D has excellent image quality especially when paired with some of the high quality prime lenses. The Olympus M.Zuiko 12mm f/2 has been getting rave reviews. So have the 45mm and the 75mm. In fact, Scott mentioned that the Olympus M.Zuiko 75mm f/1.8 may be the sharpest lens he's tested, and believe, he's tested everything. See the full blog post at Photofocus.com. What makes this even more interesting is a kit with some of these lenses may cost less than a DSLR set up.
So begins my internal dialogue. If a micro four thirds camera, when paired with the correct lens, can have as good of image quality as anything... Certainly it must be as good as my Nikon D7000. If that's true, what new possibilities could this smaller camera offer? The more portable frame is much more likely to be with me. I can't tell you how many times I've brought my camera bag, but end up leaving it in the car. For me, bringing a camera means bringing a backpack.
Thinking of those great prime lenses, I could do many types of photography at professional quality. I could photograph my son (1 year old), do other portraits and landscape photography, plus the added portability. As someone accustomed to DSLR's, having a quality electronic viewfinder is a nice benefit. Shooting video through a viewfinder is more natural for me and offers better stability. Currently, I use a LCDVF which works well but adds even more heft to the rig. Whether it's casual video of my son, or wildlife or nature video for this website, I think it's an advantage over DSLRs.
As with everything there is a negative. I've seen multiple reviews that mention that although the autofocus for static or slow moving objects is very fast, however, tracking fast moving subjects, such as sports and wildlife is problematic. Scott mentions in a recent blog post on his personal website, ScottBourne.com that the AF can be a bit dodgy tracking wildlife, but his conclusion was that it is possible.
But there is benefit with mico four thirds system and wildlife photography. A 2x crop factor. This means I could use the Olympus 75-300mm f/4.8 which would be a 150-600mm equivalent on a 35mm format. If only somebody would make a 300mm f/4 on the micro four thirds system. This would be a 600mm f/4 equivalent. It would likely be a fraction of the price and a fraction of the size.
I also want to mention the added benefit of having a new camera to get excited about photography. I know we all probably focus too much on gear, but lets be honest, for some of us, it's part of the fun. I've heard it before, if your creativity gets stale, or your passion fades, a new toy can give it a spark. I have to say, whether I buy the OM-D or not, I like the idea of it, what it brings to the table, has indeed sparked my interest.
Enter this week's guest interview on This Week in Photo podcast. Scott Bourne who was an original host of the podcast and has been an inspiration of mine for years. Now Scott is onto other things but as I was browsing my podcast feeds, I noticed he was making a guest appearance. Scott mentioned a lot of interesting things about this Olympus camera, many of which got me thinking.
It should be noted that at this point I have never used the camera and so these are just my initial thoughts on the subject. Scott mentioned that the OM-D has excellent image quality especially when paired with some of the high quality prime lenses. The Olympus M.Zuiko 12mm f/2 has been getting rave reviews. So have the 45mm and the 75mm. In fact, Scott mentioned that the Olympus M.Zuiko 75mm f/1.8 may be the sharpest lens he's tested, and believe, he's tested everything. See the full blog post at Photofocus.com. What makes this even more interesting is a kit with some of these lenses may cost less than a DSLR set up.
So begins my internal dialogue. If a micro four thirds camera, when paired with the correct lens, can have as good of image quality as anything... Certainly it must be as good as my Nikon D7000. If that's true, what new possibilities could this smaller camera offer? The more portable frame is much more likely to be with me. I can't tell you how many times I've brought my camera bag, but end up leaving it in the car. For me, bringing a camera means bringing a backpack.
Thinking of those great prime lenses, I could do many types of photography at professional quality. I could photograph my son (1 year old), do other portraits and landscape photography, plus the added portability. As someone accustomed to DSLR's, having a quality electronic viewfinder is a nice benefit. Shooting video through a viewfinder is more natural for me and offers better stability. Currently, I use a LCDVF which works well but adds even more heft to the rig. Whether it's casual video of my son, or wildlife or nature video for this website, I think it's an advantage over DSLRs.
As with everything there is a negative. I've seen multiple reviews that mention that although the autofocus for static or slow moving objects is very fast, however, tracking fast moving subjects, such as sports and wildlife is problematic. Scott mentions in a recent blog post on his personal website, ScottBourne.com that the AF can be a bit dodgy tracking wildlife, but his conclusion was that it is possible.
But there is benefit with mico four thirds system and wildlife photography. A 2x crop factor. This means I could use the Olympus 75-300mm f/4.8 which would be a 150-600mm equivalent on a 35mm format. If only somebody would make a 300mm f/4 on the micro four thirds system. This would be a 600mm f/4 equivalent. It would likely be a fraction of the price and a fraction of the size.
I also want to mention the added benefit of having a new camera to get excited about photography. I know we all probably focus too much on gear, but lets be honest, for some of us, it's part of the fun. I've heard it before, if your creativity gets stale, or your passion fades, a new toy can give it a spark. I have to say, whether I buy the OM-D or not, I like the idea of it, what it brings to the table, has indeed sparked my interest.
Friday, December 21, 2012
Happy Holidays from Natural Vision Photography!
Gray Wolf, West Yellowstone, MT
It has been a long time since our last post but we did not forget about our fans. We wanted to take this time and wish you all a safe and happy holidays!
Thursday, August 16, 2012
Yellowstone Bull Elk
Nikon D7000, Nikkor 300mm f2.8 w/TC14e II @420mm, ISO 640, f4, 1/800
Last weekend I watch Yellowstone Battle for Life on TV. I couldn't begin to tell you how many times I have watch that documentary. Every time I do watch it, I get the itch to go back out west. So instead of jumping in my car and driving 1,200 miles I sat down at my computer with a big cup of coffee. I wanted to do something different with the current image in my collection.
My last trip to Yellowstone it was snowing for much of my time out there even though it was early fall. I wanted to capture the snow and the warm colors of fall at the same time. I set out to change my "normal" editing process and set out of my comfort zone. I watched a couple "how to" videos on YouTube to see if I could come up with something of my own.
Above is what I was able to come up with. Here is the older edit which I still like, however, it doesn't accomplish my goal of showing the warm fall colors.
Tuesday, July 17, 2012
Minnesota Loon
Nikon D7000, Nikkor 300mm f2.8, f6.3, ISO 400, 1/2000
I took a quick break while fishing in central Minnesota last week. Every time I go fishing loons seemly circle boat. On this fishing trip I had my camera next to me in the boat hoping for a close encounter with a loon. I thought this would be an easy shoot, but once again I was wrong. Every time I pointed my camera at a loon it would dive down and emerge 100 feet away. I managed to snap off a few quick frames before this once dove under the water.
Thursday, July 5, 2012
Hayden Valley, Yellowstone National Park
Nikon D7000, 12mm, f13, ISO 500, 1/125
Since I'm on this black and white kick right now, I thought I should share this photo. Hayden Valley is a place inside the park that I have alway wanted to visit. Due to wild fires in during my first visit to YNP I wasn't able to go. Last fall, I was able to spend some time there. It didn't disappoint! Beautiful landscapes, wildlife, and geothermal area's all over. I highly recommend making a stop next time your in Yellowstone!
Monday, June 25, 2012
Oxbow Bend, Grand Teton National Park, WY
Nikon D7000, 24-70mm @48mm, ISO 200, f10, 1/100, Three shot HDR
Every time I get an inch to go back out west I open up my Lightroom catalog and look through my previous trips. Each time I do this I find another photo that I really like and wonder why I past it up the first couple of times. This image is of Oxbow Bend in Grand Teton National Park, WY. I have many, many shots at this location, however, while processing images I look for something to make it my own, whether it's a pano, black & white or an HDR. I want something that I haven't seen before.
This is a three shot vertical HDR image, the two images were stitched together in CS5. I was happy with the original image in color, but it was so similar to everything else I had from this location. I experimented with many different presets in Lightroom with minor tweaking. Eventually I settled on this one.
Mt. Moran didn't make much of an appearance while I was in town, but none of the less it's a great place to put your skills to the test! By doing this, it only makes me want to go back out west that much more.
Happy shooting!
Monday, June 18, 2012
Man's Best Friend
Nikon D7000, 12-24mm @19mm, f8, ISO 200, 1/640
Here is a photo of my best bud Dodger on his 4th birthday! Every year I take Dodger to his favorite park on his birthday for a photo shoot. It never takes me long to get a shot that is different than the previous year. Dodger has a personality of his own, if Dodger were in school he would be the class clown for sure!
Since my "Gone Fishing" post to mark the bringing of the summer I have done to photo shoots for one year old kids! Wow, that is a difficult subject to shoot, but when you include the parents it makes it much much easier.
That's all for now!
Sunday, May 27, 2012
Memorial Day
Nikon D7000, 12-24mm @12mm, ISO 200, f10, 1/320
Memorial Day
From Wikipedia, the free encyclopedia
This article is about the American holiday. For other uses, see Memorial Day (disambiguation).
| Memorial Day | |
|---|---|
The gravestones at Arlington National Cemetery are decorated by U.S. flags on Memorial Day weekend. | |
| Type | National |
| Date | Last Monday in May |
| 2011 date | May 30 |
| 2012 date | May 28 |
| 2013 date | May 27 |
| Observances | Remembrance of American war dead |
Memorial Day is a federal holiday observed annually in the United States on the last Monday of May.[1] Formerly known asDecoration Day, it originated after the American Civil War to commemorate the fallen Union soldiers of the Civil War. (Southern ladies organizations and southern schoolchildren had decorated Confederate graves in Richmond and other cities during the Civil War, but each region had its own date. Most dates were in May.) By the 20th century Memorial Day had been extended to honor all Americans who have died in all wars. Memorial Day is a day of remembering the men and women who died while serving in the United States Armed Forces.[2] As a marker it typically marks the start of the summer vacation season
Wednesday, May 16, 2012
Gone Fishing
Nikon D7000, Nikkor 300mm f2.8, ISO 1250, f4, 1/400
It's that time of year again for the boy's of Natural Vision Photography. Summer became a different beast last year with Chad and I fishing in bass tournaments. This year is no different, with 9 scheduled tournaments this summer and the bass fishing opener coming in a few days, our photography once again is going to take a back seat. We will continue to shoot as much as time will allow. We also will continue to share our new content via Twitter.
A huge THANK YOU to our loyal fans that check-in with us on a daily/weekly basis. Keep in touch and most importantly keep shooting!
Derek & Chad
Subscribe to:
Posts (Atom)


.jpg)